Sunday, March 6, 2016

Roof

Same as the walls I built a template on the floor for the roof


 Had to lift it up by myself again so got creative


Ridge board is 2 x 12 and 22 feet long.  Had to purchase it from 84 Lumber and strap it to my 10 foot long trailer and drive 20 miles.  That was fun - not.
 I cut one 2x6 roof truss and made sure it fit on all sides and then cut the rest of them.  I used 16 inch center spacing but 24 inch would have worked.


 I built the truss ends and then hung them up


 Fascia caps are all on now


It's not easy lifting 19/32 plywood up on the roof by yourself so I made a little ramp where I could push the plywood up from the bottom and lift it the rest of the way from the top.  This was very time consuming so suggest you get help when you do this.


 Putting the tar paper and shingles on was a PITA to say the least
 This was as far up as I could get from the ladder so placed 2x4's on roof to hang on to.


 Here you can see the 2x4's on the roof i added to hold on to.  I'm not fond of heights.


 Roof was left open at the top for ridge cap.  It was 93 degrees this day in August 2015.  I could only stay on the roof for 10 mins at a time due to the heat coming off the shingles.
 Ridge cap on - roof is D O N E done!  Finally.  phew

Sunday, August 9, 2015

Walls

Using the floor as a guide, I built all 4 walls.  Below is the 12 foot wide back wall.
This is the 12' front wall and includes the shed door opening with a 6 inch header.
Below is my little workshop where I cut the wood and keep all my supplies.  It's a small red garage next to the shed.  
The golden rule is to measure twice - cut once and don't forget it!
 Both front and back walls are completed so and I moved them off the floor and started to build the 16 foot side walls which have the windows.

 I had to think of a way to lift the wall up by myself without it falling off the edge so I attached 2 - 12 foot 2x4's to the top of each side and lifted up into place.
 Attached shorty 2x4's to the floor so the wall would not slip off the edge.  Once the walls were up, I used 2 - 3.5 inch construction screws every 16 inches and screwed the lower sill plate through the plywood to the floor joists.
Just need to add 2 header boards yet.
Walls are up now.  Lots of rain on the way so I set some long 2x4's on top of the sill and draped a tarp over.  It worked okay but ended up trapping a pile of bugs under the tarp and big pools of water on top of the tarp.


Shed floor

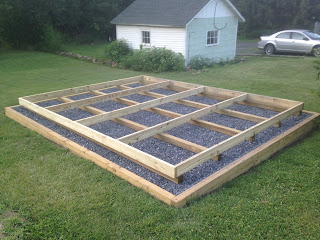
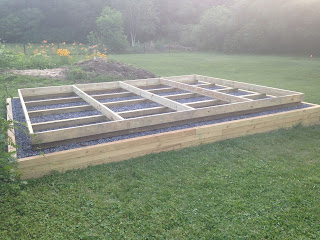
Building the floor was pretty easy and was a opportunity for me to show my sons some simple framing skills.


Started with pressure treated 4x4's running the full 16' length.  Then set the 6"pressure treated cross boards and the end boards in at 4' intervals and screwed them all together and toe nailed to the 4x4's. Used a square in all corners to square it up and double checked measuring.  Set the level on top all around and to my amazement, the bubble was right in the middle.  Leveling the stones paid off big time.